- December 30, 2024
- by ByASN
- Blogging
- 0 Comments
In this article, we will discuss the robots.txt file for your website. As a blogger, I face many issues and errors on my website’s Google search console, like indexing errors, crawling errors, feeds errors, etc. I deeply researched every crawling and indexing issue. I discovered all these errors occur on my website due to a technical problem. The name of which is robots.txt. I faced these errors a lot in my 4 years of blogging journey. I solved all my indexing issues after researching and reading the Google Central search guide. So today, I will share that experience and guide you guys.
You may also like: Profile Backlink List 2025 Download By ASN
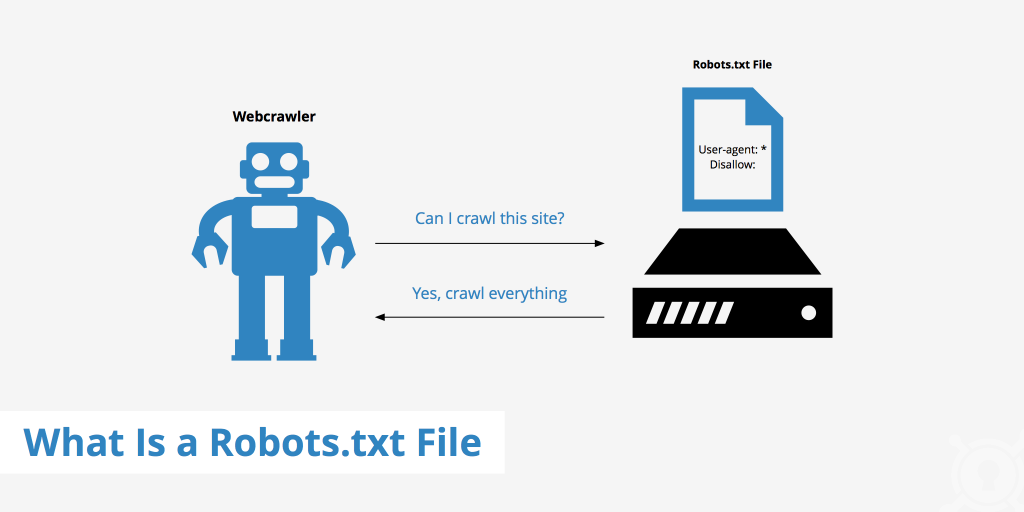
What is Robots.txt File?
The robots.txt file is a text file that website owners create to instruct web crawlers (like search engine bots) how to interact with their site. It is placed in the root directory of the website and helps control which pages or sections of the site should be crawled and indexed by these bots. Guys, do you know robots txt is 70% of your website’s life? This file is too vital for any website. Robots txt is a file whose throw-up tells the search engine’s crawler which content of your website to show or index in front of the visitor. Through this file, you can allow or disallow any content of your website, such as pages, files, links, etc., from being indexed in search engines. This file makes it much easier and faster for any search engine crawler to understand your website. Also its a text file.
What is the correct robots.txt for blogging website?
Many famous SEO tools like RankMath, Yoast, etc, provide the robots txt file by default, but this, by default file, is not 100% for your blogging website. In blogging websites, we need to allow or disallow some things from our website, such as feeds, comments, categories, HTML files, PDF files, etc. Previously, I didn’t customize the robot’s Txt file after installing any SEO plugin. Due to this, I was facing many errors in the Google Search Console. If I put these errors in the validation in Google Search Console, they never get fixed. After doing a lot of research and from my experience, I have customized a robots.txt for your blogging website, which can reduce your chances of making errors and quickly fix them can also be fixed.
How to create robots.txt file?
First you need to check your live robots.txt file through this link: httsps://yoursite.com/robots txt. Now you need to customize this file, like I wan to allow and disallow some things from my website. What I don’t want is for it not to be indexed in any search engine. You can easily create your website’s this file in any plain text editor like notepad.
User-agent: *
Allow: /
Disallow: /wp-admin/
Disallow: /search/
Disallow: /feeds/
Disallow: /comments/
Disallow: /tags/
Sitemap: https://yoursite.com/sitemap_index.xml
Guys, read this file carefully, In this file I tell the search engine through the user agent that any search engine crawler can crawl my website. After that I allow everything and I disable the wp-admin admin page to indexed in any search engine. Also I have disabled my website’s search, feeds, comments, tags because I don’t want my content to be indexed by Google or any search engine. Most of the blogging websites only index the posts. If you don’t want to index the category in it, simply add “Disallow: /category”. You can customize the robots.txt file to your liking in this way.
How to block Japanese keyword attack with robots txt?
A few days ago, my website byasn.com experienced a Japanese keyword attack. This attack resulted in a large number of Japanese keywords and URLs being generated on my site. These URLs had extensions like .html, .shtml and .htm.
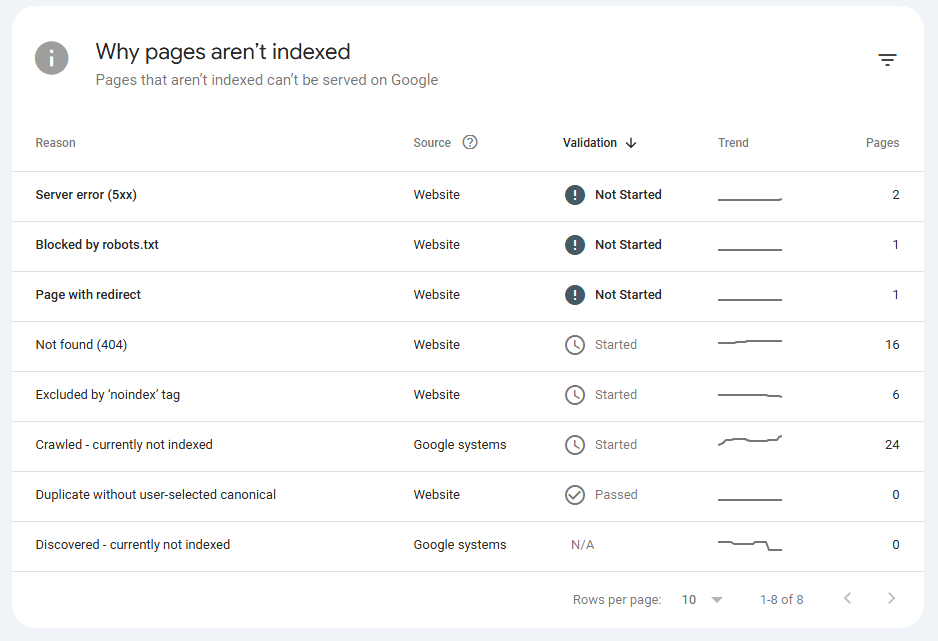
In this blog post, I want to share my personal experience on how I successfully blocked these Japanese keywords from my website using the robots.txt file. In my case, all the unwanted Japanese keywords have now been removed. You can find detailed information about these keywords in the image below.

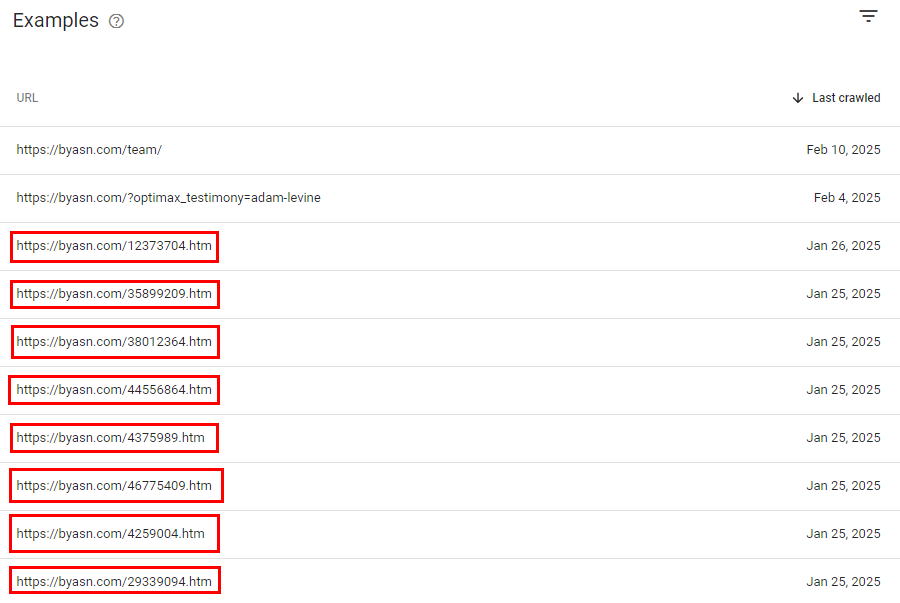
These pages or URLs were not part of my website, nor did I create them. They were redirects that sent visitors to an eCommerce store. Now, let’s talk about how I blocked and removed these URLs using the robots.txt file and how I successfully recovered my website from this attack.
First, I modified my website’s robots.txt file as follows.
User-agent: *
Disallow: /wp-admin/
Disallow: /search/
Disallow: /feeds/
Disallow: /*.html/
Disallow: /*.shtml/
Disallow: /*.htm/
Disallow: /comments/
Disallow: /tags/
Disallow: /author/
Disallow: /members/

Sitemap: https://yourdomain.com/sitemap_index.xml
In the robots.txt file, I blocked all extensions associated with the Japanese keywords, such as .html, .shtml, etc.
Steps to remove Japanese Keyword & URLs from your website:
- Block all unwanted extension from your website though robots txt file like me.
- Create a TXT file of all Japanese URLs from your website (File name: spam-url.txt) and save it.
- Upload “spam-url.txt” file in your website’s file manager.
- Update your website’s sitemap in Google Search Console.
- Also submit your “TXT” file in Google Search Console in Sitemap section like this. (https://yourdomain.com/spam-url.txt)
- After these steps Google will read your sitemap and update the site’s all URLs.
- When crawler will check your website’s Japanese URL, The crawler will find “404-Not Found”.
- And Google will remove these “404” pages after sometime.
How to upload robots.txt file in hosting server?
Its a simple and easy way. Login to your website’s file manager from your hosting server. Create a new file with name “robots.txt” in public_html folder. Write or paste your robots txt here and save it. Your file is live now.